 +1- (800) 281-9604
 Monday - Friday: 7am - 5pm
Commercial Cleaning Tips: Efficiency & Technique
If you follow us on social media, you might've seen our series of Commercial Cleaning Tips. We're doing one a week, and we're already to ten out of fifty. The first grouping is all about general efficiency and technique.
Jump Start Your Cleaning Knowledge
Turnover is a reality right now in the cleaning industry. This means there are constantly new workers coming into the professional cleaning space. Time to train new workers can be tight, and it's not always easy to transfer the less technical, "community knowledge" to new workers. That's one reason we decided to do this series. Each week, we're sharing these quick, digestible tips. Check out the first ten tips below, and be sure to follow us on LinkedIn, Facebook, and Instagram to see more.

Cleaning Tip 01: Clean Top to Bottom
Always start high (ceilings, shelves) and work downward so dust falls onto areas you haven’t cleaned yet.

Cleaning Tip 02: Clean Left to Right
Combine this tip with Tip 01 (Cleaning Top to Bottom) to create a smooth, efficient workflow as you move through the room. If you go back and forth through a room, it takes more time, you're tracking contaminants back into cleaned areas, and it's easy to lose track of what has been cleaned already. The image comes from one of our wall charts. We have standard wall charts for our products, as well as more specialized ones that are available by request. Our wall charts uses graphics and color-coded cleaning materials to make the process quick and easy.

Cleaning Tip 03: Dry Before Wet
Dry Before Wet: Avoid Regret! Ever felt tempted to just spray down a dusty surface and get going, only to be smearing gray mud across it? Remove dust and debris first before applying wet product and wiping or mopping. This will make your job easier, AND it's a great idea when it comes time to disinfect or sanitize a surface, too! Removing the dirt and debris first lets the sanitizing/disinfecting product reach the surface and do its job.

Cleaning Tip 04: Dwell On It
Time is tight when cleaning. There's always a lot to do, and not much time to do it. But one thing you never want to skip is "dwell time." This is the time a product needs to sit on a surface in order to get its full cleaning / sanitizing / disinfecting properties. Dwell times vary by a lot of factors, so be sure to familiarize yourself with the recommended dwell times in the product info. You're doing all that work, don't let it go to waste!

Cleaning Tip 05: Use Color Coded Cloths
We're big on color coding here at EnvirOx. Our products use different colors for different dilutions, so our wall charts are easy to use, for instance. Keep that color coding going! Using different color cloths while working is a great way to avoid cross contamination. You don't want to use the same microfiber cloth to clean a toilet that you use for counters in a restroom. Keeping the color coding consistent across your organization helps reinforce it.

Cleaning Tip 06: Organize with a Cart or Caddy
This is a tip that most cleaning professionals already put into practice, or quickly learn they need, but we're mentioning it anyway just in case! A cleaning caddy or cart is an essential tool for any cleaning pro. It keeps things organized and its a visual reminder to make sure you have everything you need before you set out, saving extra trips back and forth to the janitorial closet.
Bonus tip: Be sure to spray down your cart or caddy from time to time (we recommend a Heavy Duty spray like the H2Orange2 or OxiGenesis Red Dilution) and wipe it down. This makes sure that, if any occupant or client sees your cart, they view it as symbol of the cleanliness you're bringing to the rest of the building. Fair or not, your cart or caddy may be seen as a reflection of your work.

Cleaning Tip 07: Declutter Before Cleaning
At one point or another, every cleaning professional walks into... the aftermath. Declutter first before attempting to clean. Take the opportunity to look over any problem areas you'll have to tackle while cleaning. Are there cobwebs to get rid of? A stain on the wall that might need a heavy duty spray to cut through? It's easy to overlook the details when overwhelmed by the "mess" of it all. Decluttering is a great way to clear the room AND your head before getting to the cleaning and disinfecting!

Cleaning Tip 08: Use The Two Cloth Method
Here's an interesting one we'd love your feedback on. The "Two Cloth" Method. The idea is to use two different color-coded cloths. A slightly damp, plush microfiber is used first-drawing up and holding even fine dust particles. Then a second dry microfiber with a tighter weave is used to polish. The idea is to leave a shinier, streak-free surface and seems ideal for reflective surfaces.
This seems like a great "general" cleaning tip. But here's the catch. With our own multi-purpose cleaners like H2Orange2 or our OxiGenesis Hyper-Concentrate cleaner and disinfectant, we haven't noticed the need for this method to achieve a streak-free shine. This tip may really depend on the product you're using and the surface you're cleaning in terms of necessity. But we'd love to hear your experience with this method!

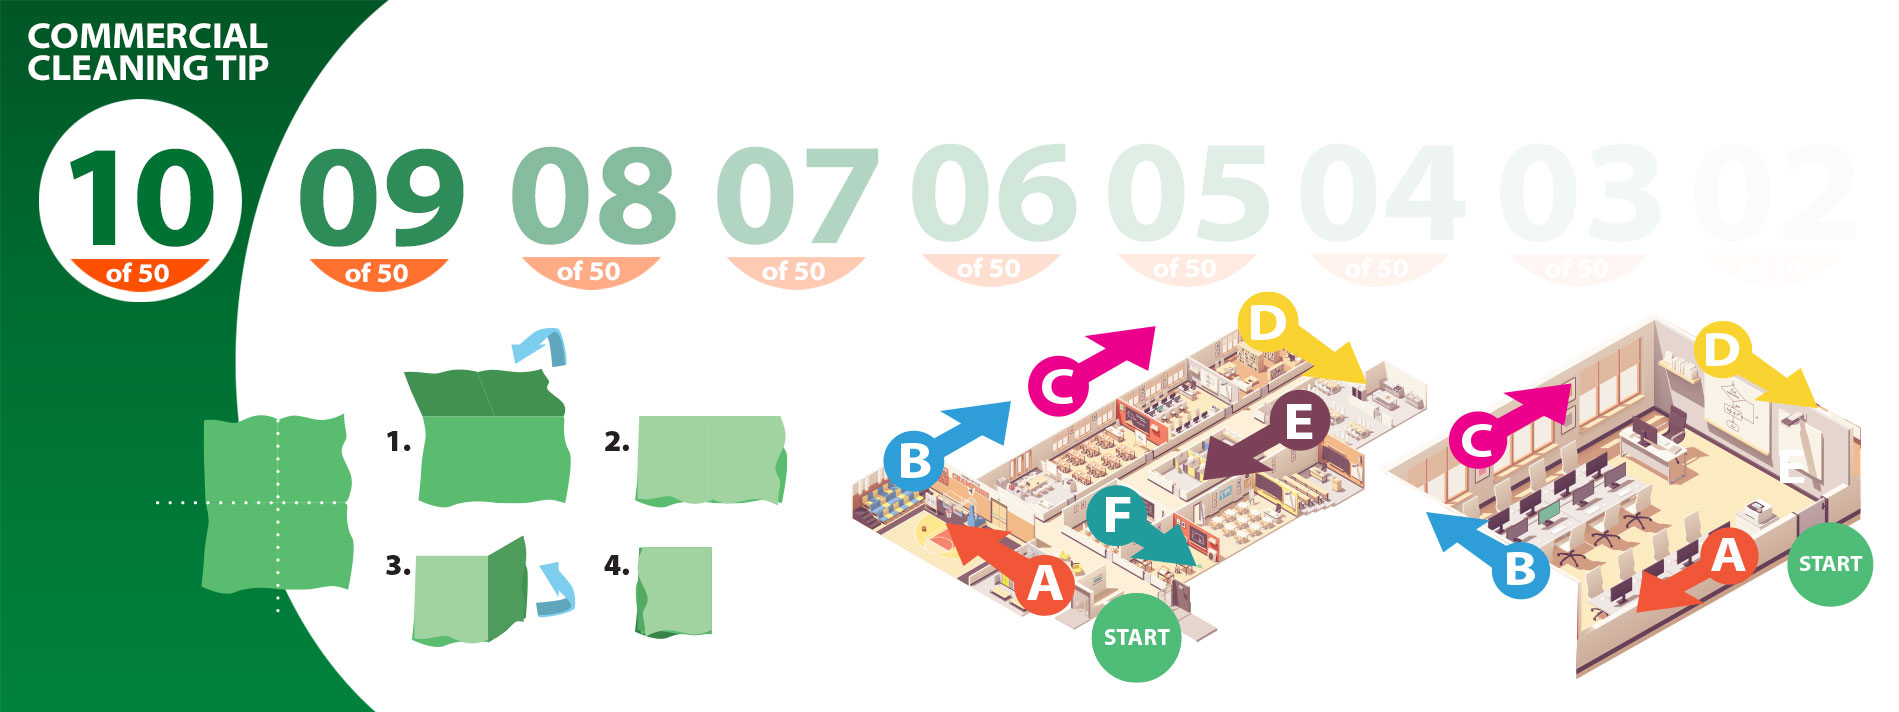
Cleaning Tip 09: Fold Your Cloth Into Quadrants
Before becoming a cleaning professional, a lot of us just grab a cloth, scrunch it up, and start wiping. But folding a cleaning cloth into quadrants as shown below gives you up to EIGHT cleaning surfaces. Microfiber cloths, in particular, are made to grab onto dust and other debris. Once the fibers are full, they become less effective. Flip the cloth, and you've got a refreshed cleaning tool that helps prevent dust and other contaminants from redistributing. Important: Remember you still need to change to a different color of cloth (see cleaning tip #5) when moving from contaminated areas, such as toilets, to other areas, such as countertops and sinks.

Cleaning Tip 10: Divide Cleaning into Sections or Zones
A consistent cleaning and disinfecting routine is one of the great keys to effective AND efficient cleaning. Planning a cleaning routine, whether for a whole facility or one single room, will help make sure you don't miss anything. One technique is to start at the entrance, and work your way around clockwise. Your focus should be on the single section you're working on.
Used in combination with the other tips we've given, this will help prevent cross-contamination, and make you far more efficient while cleaning, because you're not wasting time backtracking. The way the sections are decided depends on the facility, your cleaning tools, the number of people doing the work, and other factors. Experiment until you find the most efficient route for you.